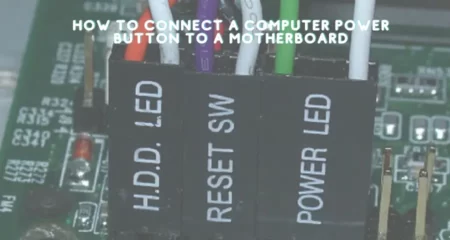
Are you tired of having to press the power button on your computer case whenever you want to turn on your computer? Here’s a tutorial on connecting the power button directly to the motherboard so you can ditch that pesky case!
✔ Quick Answer – There are a few different ways to do this, but the most common is to use a two-pin header. One pin goes to the power switch on the front of the case, and the other goes to a ground point on the motherboard.
How does power button work on motherboard?
This power button works by connecting an LED’s positive lead to a momentary switch’s positive lead. The ground LED is then connected to a ground on the motherboard.
When the button is pressed, it will complete the circuit and allow current to flow through the LED, lighting it up. You can then use this power button to turn your computer on and off.
Tools and Materials Required
To complete this project, you will need the following tools and materials:-
- Screwdriver
- Phillips head screwdriver (optional)
- Motherboard
- Power button.
First, you must find the correct screw holes on your motherboard. There are typically two, and it will label them “PWRBTN” or something similar. Once you have located these screw holes, you can proceed to the next step.
Next, take your power button and line it up with the screw holes on the motherboard. Once it is lined up, insert the screws and tighten them so that the power button is securely attached to the motherboard.
Now, you must connect the wires from the power button to the correct pins on the motherboard. It should connect the positive lead to the “+” pin and the negative charge to the “-“ pin. Once you have done this, your power button should be appropriately connected and ready to use!
Step-by-step guide
- Turn off your computer and unplug all cables connected to it. This includes the power cord.
- Open up your computer case. You may need a screwdriver to do this.
- Locate the power button on the front of the case and trace the wires leading to it. One of these wires should be labeled “PWR.”
First, check if the power button is properly connected to the motherboard. If it is not, then you will need to connect it. Depending on your motherboard, you may do this with a two-pin or three-pin header. If you are unsure how to do this, consult your motherboard manual or look for a tutorial online.
Next, check the BIOS settings to see if the power button is enabled. If it is not, then you will need to allow it to. You can usually do this in BIOS’s “Power” or “Boot” section.
Finally, if none of these solutions work, you may need to replace the power button. This is relatively easy to do and only requires a few tools. You can find instructions for replacing a power button online or in your motherboard manual.
How to connect a computer power button to a motherboard with a USB
Assuming you have a basic understanding of your computer components and how to handle them, connecting a power button to a motherboard with a USB is not tricky.
You will need:
- A Phillips screwdriver
- Something small and sharp to cut the plastic around the USB ports
- A power button (obviously)
- Patience
First, locate the two USB ports on your motherboard. They will be tiny and close together. Second, use your screwdriver to unscrew the plastic casing around the ports. Be careful not to damage any of the circuitry.
Third, insert your power button into one of the open USB ports. The fourth step is to use your sharp object to cut away any excess plastic around the port so that the power button fits snugly.
Conclusion
In conclusion, connecting a computer power button to a motherboard is a relatively straightforward process. You need to reference your motherboard manual to find the correct pins and click the power button. Once you have found the correct pins, connect the wires from the power button to those pins. That’s all there is to it!
Frequently Asked Questions
How do I connect a power button to my motherboard?
A: You’ll need to connect two wires from the power switch to the motherboard. The positive wire (usually red) goes to the “power” header, and the negative wire (typically black) goes to the “ground” header. If your motherboard doesn’t have a “power” header, you can usually use any of the other headers.
How can I start my motherboard without power button?
Assuming you have a desktop computer, one way to start your motherboard without a power button is to find the green wire from the power supply and touch it to one of the black wires. If your motherboard has onboard LEDs, you should see one of them light up.
Another way to do this is by shortening the power switch pins on the motherboard. You can do this by touching a metal object (screwdriver, paperclip) to both pins for a couple of seconds.
What do I do if my power button is broken?
If your power button is broken, there are a few things you can try in order to fix it. First, see if the button is jammed or just stuck. If it appears to be jammed, you can try gently pushing it back into place. If the button is just stuck, you can try using a toothpick or other sharp object to push it back up.
If neither of those options works, you can try opening up the phone and cleaning around the power button. Sometimes dust or other debris can get caught under the button and cause it to get stuck. Just be careful not to damage any of the other components while you’re doing this.
If all else fails, you may need to replace the power button entirely. This is usually a fairly simple process, but it will vary depending on your specific phone model.
![Why Motherboard Is Important? [Complete Details]](https://gamingwiser.com/wp-content/uploads/2021/11/Why-Motherboard-Is-Important-450x235.webp)