
If you’re like me, you’re always looking for ways to save money. And one way to do that is to reuse components when upgrading your computer. But can you reuse a CPU in a new motherboard?
The answer is yes! Although it requires a little work, you can reuse your old CPU in a new motherboard. Here’s a quick guide on how to do it.
Why you might want to reuse CPU in a new motherboard
If you’re looking to upgrade your PC but don’t want to spend the money on a new CPU, you might wonder if you can reuse your old CPU in a new motherboard. The answer is yes. In most cases, you can reuse your CPU. However, there are a few things you need to keep in mind before you make the switch.
First, check the socket type of your old CPU and compare it to the socket type of the new motherboard. If they are not compatible, then you will not be able to reuse your CPU.
Second, check the maximum number of cores and threads supported by the new motherboard. If your old CPU has more cores or threads than the new motherboard supports, you will not be able to utilize its potential fully and may cause stability problems.
Lastly, ensure that the new motherboard’s BIOS is compatible with your old CPU. If it is not, you will not be able to use your old CPU in the new motherboard.
Overall, reusing a CPU in a new motherboard is generally possible if you consider the abovementioned factors. However, it is always best to consult with someone knowledgeable about these things before making any changes to your PC.
Another Reasons for Reusing a CPU in a New Motherboard
When upgrading your computer, you have a few options for the old hardware. You can keep it as a spare, sell it, or recycle it. If you’re recycling it, you can reuse the old CPU in a new motherboard. Here are some reasons why you might want to do that:
- The first reason is cost savings. If your old CPU still works, you don’t have to buy a new one. This can save you anywhere from $50 to $200, depending on the model of CPU and motherboard.
- The second reason is convenience. If you’re upgrading your computer anyway, it’s easy to reuse the old CPU instead of buying a new one. You don’t have to worry about compatibility issues or installing drivers; the motherboard will automatically recognize the CPU and load the appropriate software.
How to determine if your CPU is still compatible
The first thing you need to do is check the CPU socket type. To do this, look up your current motherboard model number and find the specifications page.
Once you have found the specs page, look for the “CPU Socket Type” section and note which socket type your motherboard has. Alternatively, you can check the physical socket on your motherboard to see which CPU it supports.
Once you know which CPU socket type your motherboard uses, you can start looking for a new CPU compatible with your motherboard. It’s important to note that not all CPUs will work with all motherboards, so you’ll need to make sure you’re choosing a CPU compatible with your specific motherboard model.
If you’re unsure which, CPUs are compatible with your motherboard, you can use a tool like PCPartPicker to help you out. Enter your motherboard model number and choose “Show only compatible CPUs” from the drop-down menu. This will show you a list of all the compatible CPUs with your motherboard.
The potential risks of reusing a CPU
There are a few potential risks to reusing a CPU in a new motherboard. Perhaps the biggest risk is that the CPU may not be compatible with the new motherboard. Different motherboards use different chipsets, and the chipset is what determines which it can use CPUs.
Even if the socket type is the same, there’s no guarantee that a given CPU will work with a given motherboard. Incompatible CPUs can cause all kinds of problems, from instability to crashes.
Another potential risk is that you might damage the CPU or the motherboard while installing it. This is particularly true if you’re unfamiliar with proper handling and installing CPUs. It’s not difficult to do, but it does require a bit of care.
If you’re not confident in your ability to properly handle and install the CPU, it’s probably best to leave it to a professional.
Finally, there’s always the possibility of something going wrong during installation, damaging either the CPU or the motherboard (or both). While this is unlikely, it’s still a possibility that should be kept in mind.
Overall, there are some potential risks associated with reusing a CPU in a new motherboard. However, as long as you’re aware of these risks and take steps to minimize them (such as ensuring compatibility and being careful during installation), they shouldn’t pose too much of a problem.
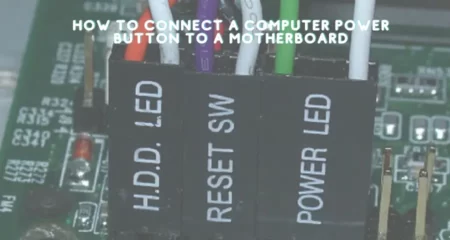
How to properly install a CPU
If you’re looking to upgrade or build a new computer, you’ll need to install a CPU. This can seem daunting, but it’s not too difficult. This guide will show you everything you need to know about installing a CPU.
Before you begin, there are a few things you’ll need:-
A socket 775 CPU-A compatible motherboard-Thermal paste (optional)-A Phillips head screwdriver (for most CPUs)-An anti-static wrist strap (optional but recommended)
Start by unboxing your CPU and examining it for any damage. If everything looks okay, then go ahead and remove the protective cover from the bottom of the chip. Take note of the gold contact pins; these are what will make contact with the socket on your motherboard.
Next, locate the CPU socket on your motherboard. The socket type will be marked, and there should also be a triangle on one corner that corresponds to the triangle on your CPU.
Line up the two triangles and gently insert your CPU into the socket until it clicks into place. If your CPU has a locking lever, engage it now.
At this point, you may apply thermal paste to the top of your CPU (if used) or proceed directly to installing your heat sink/fan assembly.
Generally speaking, applying thermal paste is best; this will help improve cooling and prevent your CPU from overheating.
To apply thermal paste, squeeze a small amount onto the centre of your CPU and spread it evenly with your finger or a credit card.
Once the thermal paste has been applied (or skipped), it’s time to install the heat sink/fan assembly according to the instructions included with your cooler.
In most cases, this will involve removing one or more screws from your motherboard and attaching the cooler with those same screws; alternatively, some coolers come with mounting hardware that you must install before attaching the cooler itself.
With the cooler installed, go ahead and reattach any case fans or other cables that may have disconnected during installation; then power on your computer and check BIOS/UEFI settings to ensure that everything is recognized properly. Tips for getting the most out of your CPU
Although it can generally use a CPU for multiple builds, there are a few things to remember to get the most out of your purchase. If you’re considering reusing a CPU in a new motherboard, here are a few tips:
-Choose a compatible motherboard: Not all motherboards are compatible with all CPUs. Do your research to ensure that you choose a motherboard that will work with your CPU.
-Update your BIOS: If you’re using an older CPU in a new motherboard, you may need to update the BIOS (basic input/output system) to use the newer hardware. This is typically only necessary for very old CPUs, but it’s something to be aware of.
-Know your limits: CPUs have throttling mechanisms to prevent them from overheating. If you’re planning on overclocking your CPU, be aware of its thermal limits and take steps to ensure adequate cooling.
Troubleshooting common CPU issues
While CPUs are designed to be compatible with a range of different motherboards, a few issues can arise when you try to reuse a CPU in a new motherboard. In most cases, it can resolve these problems by resetting the BIOS or updating the BIOS and drivers.
If you’re having trouble installing or using your CPU, here are a few common issues to check for:
–BIOS not configured properly: If your BIOS is not configured properly, your CPU may not be compatible with your motherboard. Check your motherboard manual or contact the manufacturer to ensure you use the correct settings.
Drivers not installed: If you’re using a new CPU with an older motherboard, you may need to install new drivers. Check your motherboard manual or the manufacturer’s website for more information.
Incompatible hardware: In rare cases, a CPU may be incompatible with a particular type of hardware. If you’re having trouble installing or using your CPU, check with the manufacturer to see if there are any known issues.
When upgrading your CPUFrom time to time, you may find that your computer is no longer running as smoothly as it used to. One of the first places to check for a potential bottleneck is your CPU.
Here are a few signs that it might be time to upgrade:
- Your computer is more than three years old.
- You regularly use demanding applications (e.g., video editing, 3D rendering).
- You’re noticing lag or other performance issues when using your computer.
- You’re looking to improve your gaming performance.
If you’re experiencing any of the above, then upgrading your CPU could help improve your computer’s performance. Keep in mind, though, that there are other factors to consider before taking the plunge, such as whether your motherboard is compatible with a newer CPU.
Conclusion
There is no easy answer to this question. While it is technically possible to reuse a CPU in a new motherboard, several potential risks and problems could occur. This is why it is generally not recommended to do so. If you choose to reuse your CPU, be sure to do your research and be prepared for any potential problems.
![Why Motherboard Is Important? [Complete Details]](https://gamingwiser.com/wp-content/uploads/2021/11/Why-Motherboard-Is-Important-450x235.webp)